我不想要一个在其他部分是半透明而在中间完全透明的图像视图.. 看这张图片..

我已经做到了,但这不是最好的方法..我只能在黄线内有一个透明的矩形吗...?
编辑:是否可以更改视图的某个矩形的 alpha ..?
我不想要一个在其他部分是半透明而在中间完全透明的图像视图.. 看这张图片..
我已经做到了,但这不是最好的方法..我只能在黄线内有一个透明的矩形吗...?
编辑:是否可以更改视图的某个矩形的 alpha ..?
将自定义 UIView 放置在显示图像、大小和位置的视图上以完全重叠。在自定义视图的 drawRect 方法中
- (void)drawRect:(CGRect)rect
{
    // Drawing code
    CGRect rBounds = self.bounds;

    CGContextRef context = UIGraphicsGetCurrentContext();

    // Fill background with 80% white
    CGContextSetFillColorWithColor(context, [[[UIColor whiteColor] colorWithAlphaComponent:0.8] CGColor]);
    CGContextFillRect(context, rBounds);

    // Draw the window 'frame'
    CGContextSetStrokeColorWithColor(context, [[UIColor orangeColor] CGColor]);
    CGContextSetLineWidth(context, 10);
    CGContextStrokeRect(context, self.maskRect);

    // make the window transparent
    CGContextSetBlendMode(context, kCGBlendModeClear);
    CGContextFillRect(context, self.maskRect);
}
其中 maskRect 是要显示为透明的矩形。确保自定义视图的背景颜色设置为“clearColor”
您可以编写更改 maskRect 所需的任何附加逻辑并在此视图上调用“setNeedsDisplay”。
经过大量的努力,我找到了解决方案。
这是它的代码!
-(void)touchesBegan:(NSSet *)touches withEvent:(UIEvent *)event
{

    [screenShotButton setHidden:YES];
    UITouch *touch = [touches anyObject];
    CGPoint pnt =[touch locationInView:self.view];
    CGRect viewFrame=changeView.frame;
    CGFloat x1Diff,y1Diff,x2Diff,y2Diff;
    x1Diff=ABS(viewFrame.origin.x-pnt.x);
    y1Diff=ABS(viewFrame.origin.y-pnt.y);
    x2Diff=ABS(viewFrame.origin.x+viewFrame.size.width-pnt.x);
    y2Diff=ABS(viewFrame.origin.y+viewFrame.size.height-pnt.y);
    if (x1Diff<=10) {
        left=YES;
        shouldExpand=YES;
    }
    if (y1Diff<10) {
        top=YES;
        shouldExpand=YES;
    }
    if (x2Diff<=10) {
        right=YES;
        shouldExpand=YES;
    }
    if (y2Diff<=10) {
        bottom=YES;
        shouldExpand=YES;
    }

    if(CGRectContainsPoint(changeView.frame, pnt))
    {
        shouldChange=YES;
        fromPoint=pnt;
    }
    else
    {
        shouldChange=NO;
    }


}
-(void)touchesMoved:(NSSet *)touches withEvent:(UIEvent *)event
{

    if (!shouldChange) {
        return;
    }

    if (shouldExpand)
    {
        UITouch *touch = [touches anyObject];
        CGPoint pnt =[touch locationInView:self.view];
        CGRect preFram =changeView.frame;
        CGRect modifiedFrame=preFram;
        if (left) {
            modifiedFrame.origin.x=preFram.origin.x-(fromPoint.x-pnt.x);
            modifiedFrame.size.width=preFram.size.width+fromPoint.x-pnt.x;
            fromPoint.x=pnt.x;
        }
        if (right) {
            modifiedFrame.size.width=preFram.size.width+pnt.x-fromPoint.x;
            fromPoint.x=pnt.x;

        }
        if (top) {
            modifiedFrame.origin.y=preFram.origin.y-(fromPoint.y-pnt.y);
            modifiedFrame.size.height=preFram.size.height+fromPoint.y-pnt.y;
            fromPoint.y=pnt.y;
        }
        if (bottom) {
            modifiedFrame.size.height=preFram.size.height+pnt.y-fromPoint.y;
            fromPoint.y=pnt.y;
        }
        changeView.frame=modifiedFrame;
        [clearImage setBounds:CGRectMake(0-modifiedFrame.origin.x, 0-modifiedFrame.origin.y, clearImage.frame.size.width, clearImage.frame.size.height)];

    }
    else
    {
        UITouch *touch = [touches anyObject];
        CGPoint pnt =[touch locationInView:self.view];
        changeView.center=CGPointMake(changeView.center.x-fromPoint.x+pnt.x, changeView.center.y-fromPoint.y+pnt.y);
        [clearImage setBounds:CGRectMake(0-changeView.frame.origin.x, 0-changeView.frame.origin.y, clearImage.frame.size.width, clearImage.frame.size.height)];
        fromPoint=pnt;
    }


}
-(void)touchesEnded:(NSSet *)touches withEvent:(UIEvent *)event
{
    [screenShotButton setHidden:NO];
    left=top=right=bottom=NO;
    shouldExpand=NO;
    fromPoint=CGPointZero;
    toPoint=CGPointZero;
    shouldChange=NO;
}

- (IBAction)takeScreenShot:(id)sender
{
    [screenShotButton setHidden:YES];
    UIGraphicsBeginImageContext(self.view.frame.size);
    CGContextRef context = UIGraphicsGetCurrentContext();
    CGContextScaleCTM(context, 1.0, 1.0);
    [self.view.layer renderInContext:context];
    UIImage *img = UIGraphicsGetImageFromCurrentImageContext();
    UIGraphicsEndImageContext();

    NSString *docPath = [NSSearchPathForDirectoriesInDomains(NSDocumentDirectory, NSUserDomainMask, YES) objectAtIndex:0];
    NSString *filePath = [NSString stringWithFormat:@"%@/1.png",docPath];
    CGRect cutRect = changeView.frame;
    CGImageRef imgRef = CGImageCreateWithImageInRect([img CGImage], cutRect);
    CFURLRef url = (__bridge CFURLRef)[NSURL fileURLWithPath:filePath];
    CGImageDestinationRef destination = CGImageDestinationCreateWithURL(url, kUTTypePNG, 1, NULL);
    CGImageDestinationAddImage(destination, imgRef, nil);
    CFRelease(imgRef);

    if (!CGImageDestinationFinalize(destination)) {
        NSLog(@"Failed to write image to %@", filePath);
    }
    img=nil;
    imgRef=nil;
    CFRelease(destination);
    [screenShotButton setHidden:NO];
    [changeView setHidden:NO];
}
只是,这里的逻辑很重要!!
你为什么不这样做:
一个简单的方法
   1:Create a image in photoshop with the alpha values which you have specified.
   2:Place the new imageview  over your image .
   3:If you want to move the transparent box ,change the image frame.
   4:If you want to expand you just change the size of upper image.
我想你可以使用 CGContext
void CGContextDrawRadialGradient(
  CGContextRef context,
  CGGradientRef gradient,
  CGPoint startCenter,
  CGFloat startRadius,
  CGPoint endCenter,
  CGFloat endRadius,
  CGGradientDrawingOptions options
);
请参阅下面的链接CGContext 参考 或CGGradient 参考
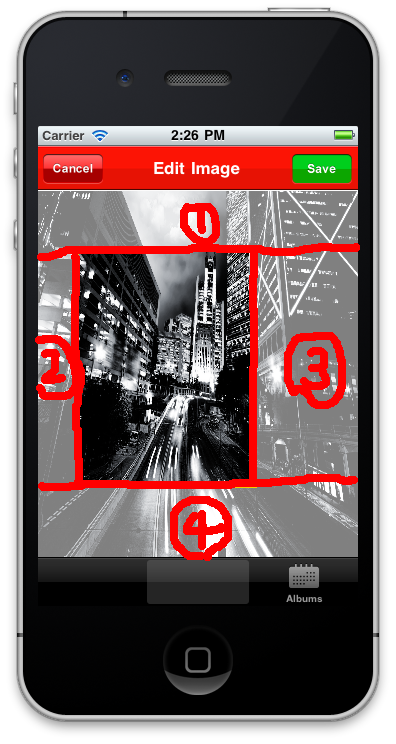
我认为您也许可以更改所选矩形的外部。至于下图,你应该 4 个矩形的 4 个 alpha。例如,首先您设置白色窗口背景颜色,然后将 4 个 alpas 矩形设置为 0.5。
我认为您最好使用 CALayer 而不是 UIView。
我希望我的建议对你有所帮助。