多因素身份验证的 Spring OAuth2 实现的完整代码已上传到此链接的文件共享站点。下面给出了说明,只需几分钟即可在任何计算机上重新创建当前问题。
**当前问题:**
大多数身份验证算法都能正常工作。直到下面显示的控制流结束,程序才会中断。具体来说,在下面的 **SECOND PASS** 结束时会抛出“Invalid CSRF token found for http://localhost:9999/uaa/oauth/token”错误。上面链接中的应用程序是通过向这个Spring Boot OAuth2 GitHub 示例的`authserver` 应用程序添加自定义`OAuth2RequestFactory`、`TwoFactorAuthenticationFilter` 和`TwoFactorAuthenticationController` 开发的。**需要对以下代码进行哪些具体更改才能解决此 CSRF 令牌错误并启用 2 因素身份验证?** 我的研究使我怀疑 `CustomOAuth2RequestFactory`(此链接上的 API) 可能是配置解决方案的地方,因为它定义了管理`AuthorizationRequest`和`TokenRequest`的方法。**官方 OAuth2 规范的这一部分表明向授权端点发出的请求的 `state` 参数是添加 `csrf` 令牌的地方。** 另外,链接中的代码使用授权码授予在这个链接中描述的类型到官方规范,这意味着流程中的步骤C不会更新`csrf`代码,从而触发步骤D中的错误。(您可以查看整个流程,包括步骤C和步骤D在官方规格。)
**围绕当前错误的控制流:**
在下面的流程图中,通过 `TwoFactorAuthenticationFilter` 在 **SECOND PASS** 期间引发了当前错误。一切都按预期工作,直到控制流进入**第二次通过**。以下流程图说明了可下载应用程序中的代码所采用的两因素身份验证过程的控制流程。
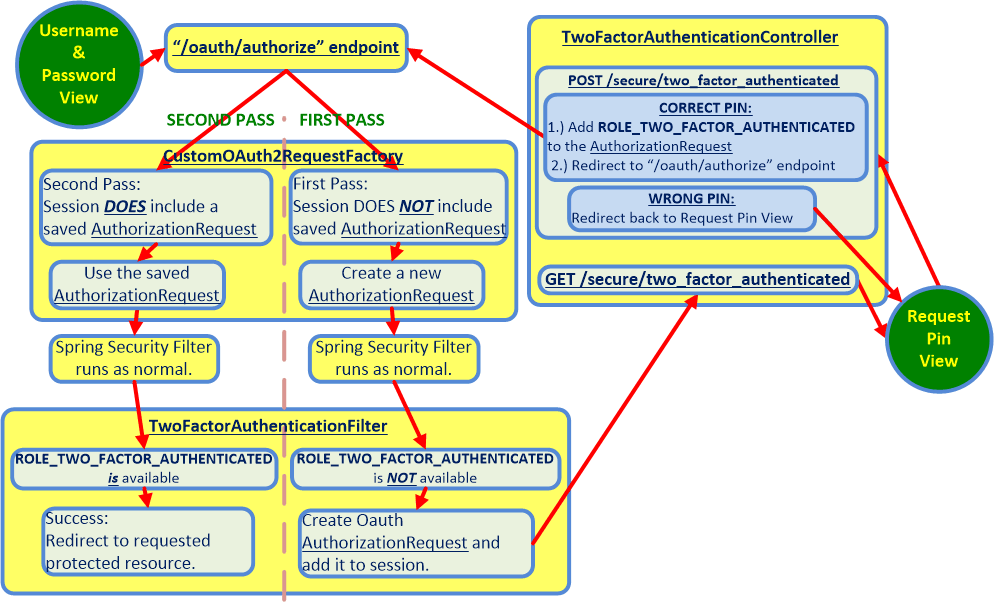 具体来说,`POST`s 和 `GET`s 序列的 Firefox `HTTP` 标头表明,序列中的每个请求都会发送相同的 `XSRF` cookie。`XSRF` 令牌值在`POST /secure/two_factor_authentication` 之后才会引起问题,这会在`/oauth/authorize` 和`/oauth/token` 端点触发服务器处理,使用`/oauth/token`抛出 `Invalid CSRF token found for http://localhost:9999/uaa/oauth/token` 错误。要了解上述控制流程图与 `/oauth/authorize` 和 `/oauth/token` 端点之间的关系,您可以将上述流程图与官方规范中的单因素流程图表并排比较在单独的浏览器窗口中。上面的 **SECOND PASS** 只是第二次执行单因素官方规范中的步骤,但在 **SECOND PASS** 期间具有更大的权限。
**什么日志说:**
HTTP 请求和响应标头表明: 1.) 使用正确的 `username` 和 `password` 提交到 `9999/login` 会导致重定向到 `9999/authorize?client_id=acme&redirect_uri=/login&response_type=code&state= sGXQ4v`后跟一个`GET 9999/secure/two_factor_authenticated`。一个 XSRF 令牌在这些交易所中保持不变。( )` 并继续执行 `request 9999/oauth/token`,但 `9999/oauth/token` 拒绝该请求,因为相同的旧 XSRF 令牌与新的 `XSRF` 令牌值不匹配,该值显然是在 **第一次通过**。官方规格。但目前尚不清楚这是否会导致问题。此外,尚不清楚如何访问参数以从“TwoFactorAuthenticationController.POST”发送完整的请求。我为 `POST 9999/secure/two_factor_authentication` 控制器方法的`HttpServletRequest` 中的`parameters` `Map` 做了一个SYSO,它只包含`pinVal` 和`_csrf` 变量。您可以通过单击此链接阅读文件共享站点上的所有 HTTP 标头和 Spring Boot 日志。
**失败的方法:**
我在 Spring Security 3.2 环境中尝试了@RobWinch 解决类似问题的方法,但该方法似乎不适用于 Spring OAuth2 的上下文。具体来说,当在下面显示的 `TwoFactorAuthenticationFilter` 代码中取消注释以下 `XSRF` 更新代码块时,下游请求标头确实会显示不同/新的 `XSRF` 令牌值,但会引发相同的错误。if(AuthenticationUtil.hasAuthority(ROLE_TWO_FACTOR_AUTHENTICATED)){ CsrfToken token = (CsrfToken) request.getAttribute("_csrf"); response.setHeader("XSRF-TOKEN"/*"X-CSRF-TOKEN"*/, token.getToken()); } **这表示需要更新 `XSRF` 配置,以使 `/oauth/authorize` 和 `/oauth/token` 能够相互通信并与客户端和资源应用程序进行通信,以成功管理`XSRF` 令牌值。** 也许 `CustomOAuth2RequestFactory` 需要更改才能完成此操作。但是怎么做?
**相关代码:**
`CustomOAuth2RequestFactory` 的代码是: public class CustomOAuth2RequestFactory extends DefaultOAuth2RequestFactory { public static final String SAVED_AUTHORIZATION_REQUEST_SESSION_ATTRIBUTE_NAME = "savedAuthorizationRequest"; 公共 CustomOAuth2RequestFactory(ClientDetailsService clientDetailsService) { super(clientDetailsService); } @Override public AuthorizationRequest createAuthorizationRequest(Map authorizationParameters) { ServletRequestAttributes attr = (ServletRequestAttributes) RequestContextHolder.currentRequestAttributes(); HttpSession 会话 = attr.getRequest().getSession(false); if (session != null) { AuthorizationRequest 授权请求 = (AuthorizationRequest) 会话。getAttribute(SAVED_AUTHORIZATION_REQUEST_SESSION_ATTRIBUTE_NAME); if (authorizationRequest != null) { session.removeAttribute(SAVED_AUTHORIZATION_REQUEST_SESSION_ATTRIBUTE_NAME); 返回授权请求;} } return super.createAuthorizationRequest(authorizationParameters); } } `TwoFactorAuthenticationFilter` 的代码是: // 这个类是按以下方式添加的: https://stackoverflow.com/questions/30319666/two-factor-authentication-with-spring-security-oauth2 /** * 存储 oauth会话中的授权请求,以便它可以 * 稍后被 {@link com.example.CustomOAuth2RequestFactory} * 选择以继续授权流程。*/ public class TwoFactorAuthenticationFilter extends OncePerRequestFilter { private RedirectStrategy redirectStrategy = new DefaultRedirectStrategy(); 私有 OAuth2RequestFactory oAuth2RequestFactory;//下面这两个是作为测试添加的,以避免在未定义时发生的编译错误。公共静态最终字符串 ROLE_TWO_FACTOR_AUTHENTICATED = "ROLE_TWO_FACTOR_AUTHENTICATED"; 公共静态最终字符串 ROLE_TWO_FACTOR_AUTHENTICATION_ENABLED = "ROLE_TWO_FACTOR_AUTHENTICATION_ENABLED"; @Autowired public void setClientDetailsService(ClientDetailsService clientDetailsService) { oAuth2RequestFactory = new DefaultOAuth2RequestFactory(clientDetailsService); } private boolean twoFactorAuthenticationEnabled(Collection authority) { System.out.println(">>>>>>>>>>> 权限列表包括:"); for (GrantedAuthority authority : authority) { System.out.println("auth: "+authority.getAuthority() ); } 返回 authority.stream().anyMatch( authority -> ROLE_TWO_FACTOR_AUTHENTICATION_ENABLED.equals(authority.getAuthority()) ); } @Override protected void doFilterInternal(HttpServletRequest request, HttpServletResponse response, FilterChain filterChain) throws ServletException, IOException { System.out.println("-------------------- INSIDE TwoFactorAuthenticationFilter. + twoFactorAuthenticationEnabled(authorizationRequest.getAuthorities())); System.out.println("========================= twoFactorAuthenticationEnabled(SecurityContextHolder.getContext().getAuthentication().getAuthorities()) 是:" + twoFactorAuthenticationEnabled(SecurityContextHolder.getContext().getAuthentication().getAuthorities())); if (twoFactorAuthenticationEnabled(authorizationRequest.getAuthorities()) || twoFactorAuthenticationEnabled(SecurityContextHolder.getContext().getAuthentication().getAuthorities())) { // 保存 session 中的授权请求。这允许 CustomOAuth2RequestFactory // 在用户成功后将此保存的请求返回到 AuthenticationEndpoint // 进行两因素身份验证。request.getSession().setAttribute(CustomOAuth2RequestFactory.SAVED_AUTHORIZATION_REQUEST_SESSION_ATTRIBUTE_NAME, authorizationRequest); // 重定向用户需要输入两因素认证码的页面 redirectStrategy.sendRedirect(request, response, ServletUriComponentsBuilder.fromCurrentContextPath() .path(TwoFactorAuthenticationController.PATH) .toUriString()); 返回; } } //下一个“IF”块在取消注释时不能解决错误 //if(AuthenticationUtil.hasAuthority(ROLE_TWO_FACTOR_AUTHENTICATED)){ // CsrfToken token = (CsrfToken) request.getAttribute("_csrf"); // 这是作为标头或 HTTP 参数包含的令牌的值 // response.setHeader("XSRF-TOKEN", token.getToken()); //} filterChain.doFilter(request, response); } 私有映射 paramsFromRequest(HttpServletRequest 请求) { 映射参数 = new HashMap(); for (Entry entry : request.getParameterMap().entrySet()) { params.put(entry.getKey(), entry.getValue()[0]); } 返回参数;} } } 私有映射 paramsFromRequest(HttpServletRequest 请求) { 映射参数 = new HashMap(); for (Entry entry : request.getParameterMap().entrySet()) { params.put(entry.getKey(), entry.getValue()[0]); } 返回参数;} } } 私有映射 paramsFromRequest(HttpServletRequest 请求) { 映射参数 = new HashMap(); for (Entry entry : request.getParameterMap().entrySet()) { params.put(entry.getKey(), entry.getValue()[0]); } 返回参数;} }
**在您的计算机上重现问题:**
只需几分钟,您就可以通过以下简单步骤在任何计算机上重现问题: 1.)通过单击此链接从文件共享站点下载应用程序的压缩版本. 2.) 输入解压应用程序:`tar -zxvf oauth2.tar(2).gz` 3.) 导航到`oauth2/authserver` 启动`authserver`应用程序,然后输入`mvn spring-boot:run` . 4.) 通过导航到 `oauth2/resource` 然后输入 `mvn spring-boot:run` 来启动`resource`应用程序 5.) 通过导航到`oauth2/ui`然后输入`mvn`来启动`ui`应用程序spring-boot:run` 6.) 打开网络浏览器并导航到`http://localhost:8080` 7.) 点击`Login`,然后输入`Frodo`作为用户和`MyRing`作为密码,然后点击提交。8.) 输入“5309”作为“Pin Code”并点击提交。**这将触发上面显示的错误。** 您可以通过以下方式查看完整的源代码:a.) 将 maven 项目导入您的 IDE,或 b.) 在解压缩的目录中导航并使用文本编辑器打开。
您可以通过单击此链接 阅读文件共享站点上的所有 HTTP 标头和 Spring Boot 日志。