我正在尝试学习ANTLR4,但我的第一个实验已经遇到了一些问题。
这里的目标是学习如何使用 ANTLR 语法高亮 QScintilla 组件。为了练习一点,我决定要学习如何正确突出显示*.ini文件。
首先,为了运行 mcve,您需要:
- 下载 antlr4 并确保它可以工作,阅读主站点上的说明
- 安装 python antlr 运行时,只需执行以下操作:
pip install antlr4-python3-runtime 生成词法分析器/解析器
ini.g4:grammar ini; start : section (option)*; section : '[' STRING ']'; option : STRING '=' STRING; COMMENT : ';' ~[\r\n]*; STRING : [a-zA-Z0-9]+; WS : [ \t\n\r]+;
通过运行antlr ini.g4 -Dlanguage=Python3 -o ini
最后,保存
main.py:import textwrap from PyQt5.Qt import * from PyQt5.Qsci import QsciScintilla, QsciLexerCustom from antlr4 import * from ini.iniLexer import iniLexer from ini.iniParser import iniParser class QsciIniLexer(QsciLexerCustom): def __init__(self, parent=None): super().__init__(parent=parent) lst = [ {'bold': False, 'foreground': '#f92472', 'italic': False}, # 0 - deeppink {'bold': False, 'foreground': '#e7db74', 'italic': False}, # 1 - khaki (yellowish) {'bold': False, 'foreground': '#74705d', 'italic': False}, # 2 - dimgray {'bold': False, 'foreground': '#f8f8f2', 'italic': False}, # 3 - whitesmoke ] style = { "T__0": lst[3], "T__1": lst[3], "T__2": lst[3], "COMMENT": lst[2], "STRING": lst[0], "WS": lst[3], } for token in iniLexer.ruleNames: token_style = style[token] foreground = token_style.get("foreground", None) background = token_style.get("background", None) bold = token_style.get("bold", None) italic = token_style.get("italic", None) underline = token_style.get("underline", None) index = getattr(iniLexer, token) if foreground: self.setColor(QColor(foreground), index) if background: self.setPaper(QColor(background), index) def defaultPaper(self, style): return QColor("#272822") def language(self): return self.lexer.grammarFileName def styleText(self, start, end): view = self.editor() code = view.text() lexer = iniLexer(InputStream(code)) stream = CommonTokenStream(lexer) parser = iniParser(stream) tree = parser.start() print('parsing'.center(80, '-')) print(tree.toStringTree(recog=parser)) lexer.reset() self.startStyling(0) print('lexing'.center(80, '-')) while True: t = lexer.nextToken() print(lexer.ruleNames[t.type-1], repr(t.text)) if t.type != -1: len_value = len(t.text) self.setStyling(len_value, t.type) else: break def description(self, style_nr): return str(style_nr) if __name__ == '__main__': app = QApplication([]) v = QsciScintilla() lexer = QsciIniLexer(v) v.setLexer(lexer) v.setText(textwrap.dedent("""\ ; Comment outside [section s1] ; Comment inside a = 1 b = 2 [section s2] c = 3 ; Comment right side d = e """)) v.show() app.exec_()
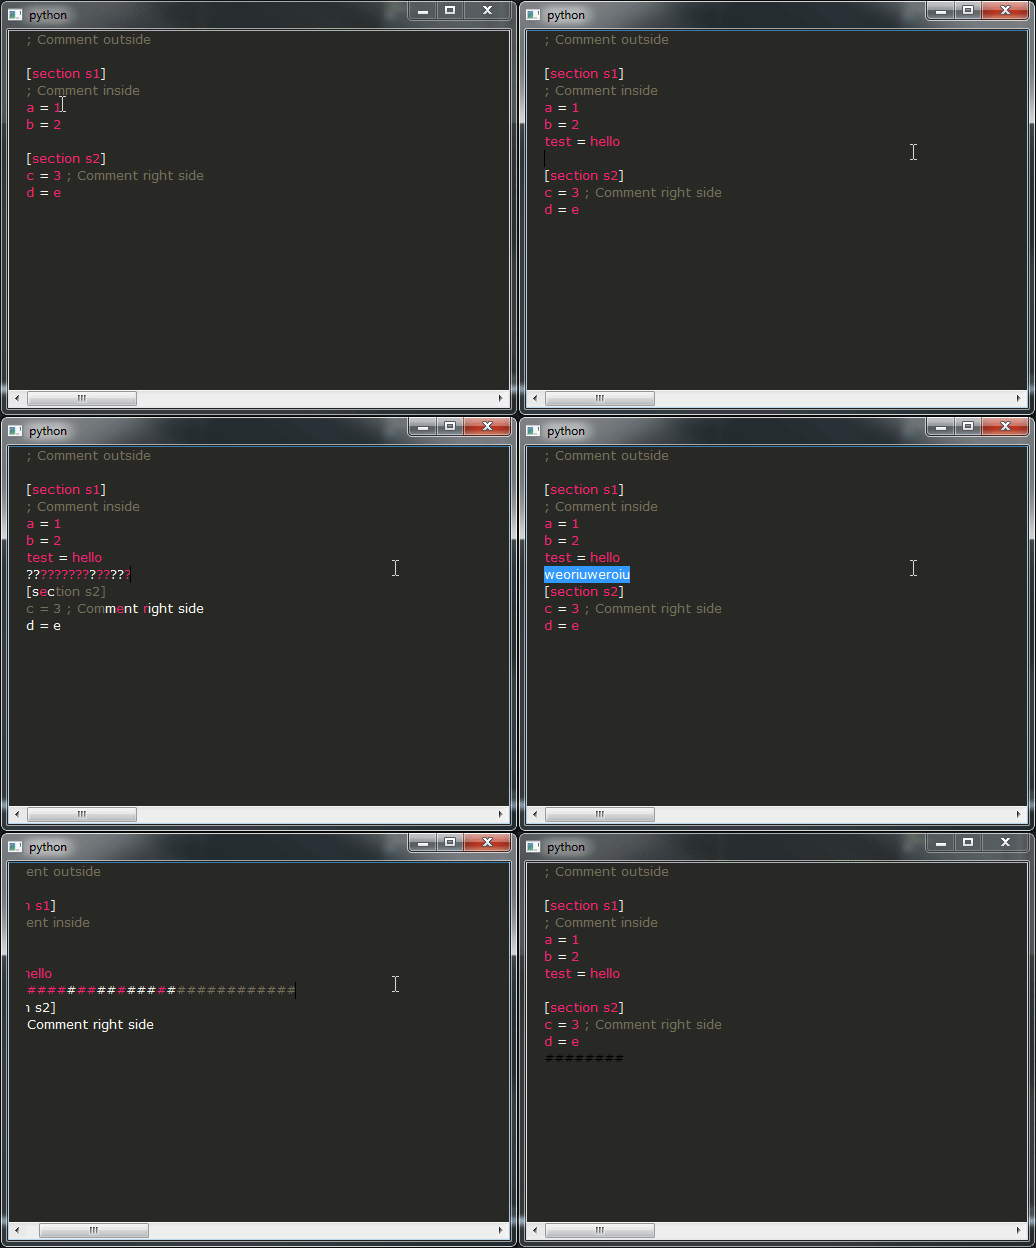
运行它,如果一切顺利,你应该得到这个结果:

这是我的问题:
- 如您所见,演示的结果远非可用,您绝对不希望这样,这真的很令人不安。相反,您希望获得与所有 IDE 类似的行为。不幸的是,我不知道如何实现这一点,您将如何修改提供这种行为的代码段?
- 现在,我正在尝试模仿与以下快照类似的突出显示:
您可以在该屏幕截图上看到变量赋值(变量=深粉色和值=黄色)的突出显示不同,但我不知道如何实现,我尝试使用这个稍微修改的语法:
grammar ini;

start : section (option)*;
section : '[' STRING ']';
option : VARIABLE '=' VALUE;

COMMENT : ';'  ~[\r\n]*;
VARIABLE  : [a-zA-Z0-9]+;
VALUE  : [a-zA-Z0-9]+;
WS      : [ \t\n\r]+;
然后将样式更改为:
style = {
    "T__0": lst[3],
    "T__1": lst[3],
    "T__2": lst[3],
    "COMMENT": lst[2],
    "VARIABLE": lst[0],
    "VALUE": lst[1],
    "WS": lst[3],
}
但是如果您查看词法分析输出,您会发现 和 之间没有区别VARIABLE,VALUES因为 ANTLR 语法中的顺序优先。所以我的问题是,您将如何修改语法/片段以实现这种视觉外观?

