1

我正在将我的 esp8266 连接到我的 arduino nano

ESP Tx > Arudino Tx
ESP Rx > Arduino Rx
ESP 3.3v > Arduino 3v3
ESP Dh_cp > Arduino 3v3
ESP Gnd > Arduino Gnd

我通过 USB 和 12V 在 VIN 提供 arduino nano,对所有人使用公共接地

我已经尝试了所有波特率并发送了 AT 命令。ESP8266 的红灯常亮,蓝灯仅在启动时亮,arduino 的 TX 红灯在连接 ESP8266 时也常亮。

作为最后的手段,我尝试使用 espressif 站点的固件刷新 ESP8266,我刷新了 nonos sdk(非启动版本)v2.0.0。

串行监视器不显示任何波特率

我已经尝试了很多我在网上找到的代码,比如这里的代码:但主要是我使用一个空白代码,因为我只想将 esp8266 连接到 arduino 并让它给出某种反馈,它现在正在工作。就像在这个链接中:http ://randomnerdtutorials.com/getting-started-with-esp8266-wifi-transceiver-review/

使用此代码

#include <SoftwareSerial.h>
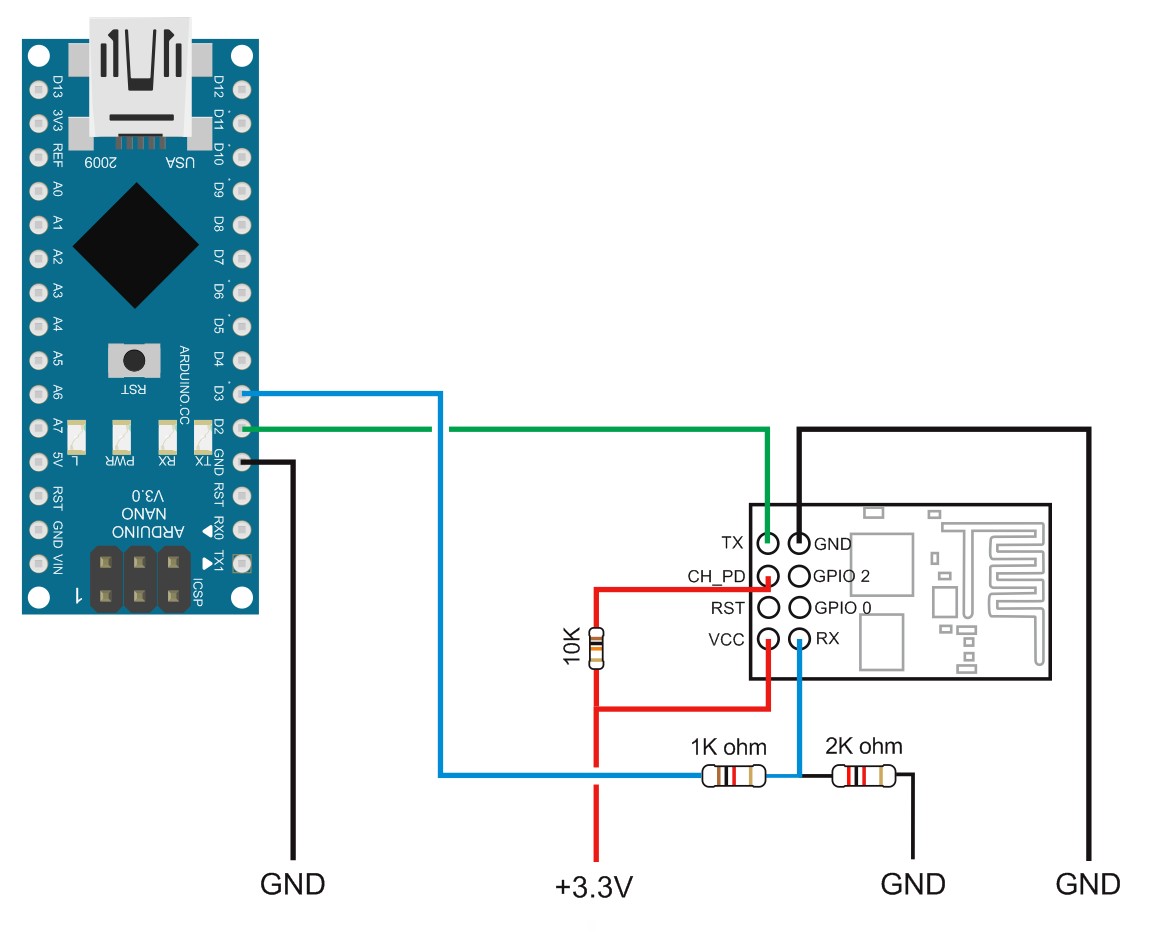
SoftwareSerial ESPserial(2, 3); // RX | TX

void setup() 
{
    Serial.begin(115200);     // communication with the host computer
    //while (!Serial)   { ; }

    // Start the software serial for communication with the ESP8266
    ESPserial.begin(115200);  

    Serial.println("");
    Serial.println("Remember to to set Both NL & CR in the serial monitor.");
    Serial.println("Ready");
    Serial.println("");    
}

void loop() 
{
    // listen for communication from the ESP8266 and then write it to the serial monitor
    if ( ESPserial.available() )   {  Serial.write( ESPserial.read() );  } else { Serial. println("not ready");}

    // listen for user input and send it to the ESP8266
    if ( Serial.available() )       {  ESPserial.write( Serial.read() );  }
}

串行监视器不断打印“未准备好”,所以我猜测 ESP 模块无法读取,但我不知道如何从中诊断问题

闪烁时我使用波特率 115200

也使用此电路进行测试http://www.martyncurrey.com/wp-content/uploads/2015/01/Arduino-to-ESP8266.jpg

4

4 回答 4

0

您应该始终将RX(接收)TX (发送)交叉 ,如下所示:

ESP Rx > Arudino Tx

ESP Tx > Arduino 接收

ESP 3.3v > Arduino 3v3

ESP Dh_cp > Arduino 3v3

ESP 接地 > Arduino 接地

您还应该精简外部电源,因为 ESP 需要比 Arduino 提供的更多的安培数,而且它可能无法正常工作(肯定不可靠)。

(不要忘记为 arduino、电源和 ESP 做一个公共 GND)

于 2018-06-08T11:35:18.393 回答
0

其他答案都提出了您应该更改的内容,但这些可能不是问题的罪魁祸首。有一个致命错误。软件串行在 115200 的波特率下不起作用。您必须使用空白草图将 ESP8266 连接到 TX 和 RX 引脚,并将 ESP8266 的波特率更改为 9600,然后软件串行才能将其拾取。

另外,我认为代码不能正确接收返回。尝试更多的东西:

#define RX_PIN 3
#define TX_PIN 2
#define ESP_BRATE 9600

SoftwareSerial esp8266(RX_PIN, TX_PIN);

bool at_command(String command, int timeout_ms, String* output) {
  esp8266.println(command);

  String ret;

  int start_time = millis();
  while (timeout_ms == -1 || millis() < start_time + timeout_ms) {
    String line = esp8266.readStringUntil('\n');
    if (line == "OK\r") {
      if (output) {
        *output = ret;
      }
      return true;
    }
    if (line == "ERROR\r") {
      if (output) {
        *output = ret;
      }
      return false;
    }

    ret += line;
    ret += '\n';
  }
  if (output) {
    *output = ret;
  }
  return false;
}

void setup()
{
  Serial.begin(9600);
  while (!Serial) {
    delay(10);
  }

  esp8266.begin(ESP_BRATE); // I changed this on the ESP to 9600
  while (!esp8266) {
    delay(10);
  }

  String out;
  bool ret;

  ret = at_command("AT", -1, &out);
  Serial.println(out);
  if (!ret) {
    Serial.println("AT is not returning OK");
    return;
  }

可以在此处找到基于 ESP8266-01 的气象站的完整示例代码,这可能有助于向您展示该做什么。它包含大量有关使用 ESP 的文档,应该可以让您到达您需要的地方!

于 2019-01-04T16:20:58.900 回答
0

如果您只想使用 AT 命令,则只需上传其中包含的空白草图void setup(){}
void loop(){} 。另外,请保持接线原样。我正在做同样的事情,它对我很好。您也可以参考此链接 https://www.instructables.com/id/Getting-Started-With-the-ESP8266-ESP-01/

于 2018-06-08T04:22:53.730 回答
0

ESP Rx -> Arudino Tx ESP Tx -> Arduino Rx

改变它,我认为它会工作

祝你好运。

于 2017-10-13T07:42:16.567 回答